Tuesday, 12 February 2013

Usage of StandardSetController Class and Methods


StandardSetController Class
===================
-StandardSetController objects allow you to create list controllers similar to, or as extensions of, the pre-built Visualforce list controllers provided by Salesforce.

-This is useful for writing pages that perform mass updates (applying identical changes to fields within a collection of objects).

-Fields that are required in other Salesforce objects will keep the same requiredness when used by the prototype object.

Instantiation
========

-You can instantiate a StandardSetController in either of the following ways:

-From a list of sObjects:
List accountList = [SELECT Name FROM Account LIMIT 20];
ApexPages.StandardSetController ssc = new   ApexPages.StandardSetController(accountList);

-From a query locator:
ApexPages.StandardSetController ssc = new ApexPages.StandardSetController(Database.getQueryLocator([SELECT Name,CloseDate FROM Opportunity]));

-Note:
-The maximum record limit for StandardSetController is 10,000 records.
-Instantiating StandardSetController using a query locator returning more than 10,000 records causes a LimitException to be thrown.
-However, instantiating StandardSetController with a list of more than 10,000 records doesn’t throw an exception, and instead truncates the records to the limit.

Methods
=======

-StandardSetController methods are all called by and operate on a particular instance of a StandardSetController.


Example
======

The following example shows how a StandardSetController object can be used in the constructor for a custom list controller:

public class opportunityList2Con {
    // ApexPages.StandardSetController must be instantiated
    // for standard list controllers
    public ApexPages.StandardSetController setCon {
        get {
            if(setCon == null) {
                setCon = new ApexPages.StandardSetController(Database.getQueryLocator(
                    [SELECT Name, CloseDate FROM Opportunity]));
            }
            return setCon;
        }
        set;
    }

    // Initialize setCon and return a list of records
    public List getOpportunities() {
        return (List) setCon.getRecords();
    }
}


The following Visualforce markup shows how the controller above can be used in a page:


Friday, 8 February 2013

How to use ANT for metadata backup & deployments?


We generally take metadata backups from Salesforce as a part of our regular deployments. And what I have noticed is that using ANT is faster that that of Eclipse.

Following are the manual things that we generally do while taking the backup using ANT.
1) Change the username and password to point to that particular org in the build.properties.
2) Change the server url to point to either sandbox or prod.
3) Change the name of the backup folder once the backup is taken – add a prefix or suffix of current date.
The following steps help you to prevent the above manual changes every time you use ANT to take a backup.
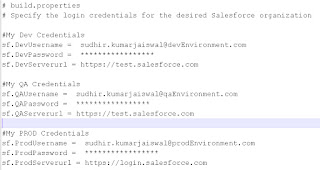
1) Open the build.properties and create your own variables (for storing the credentials) for different Orgs as shown below.


2) Create a date variable to store the current date in the same build.properties as shown below


#Date variable
sf.date = 01-22-2013


3) Now open the build.xml from the same folder as that of build.properties and create the targets as shown below.
Note that each target is using the org specific variables that we created in build.xml
Note that the dir attribute (in mkdir tag) and retrieveTarget attribute (in sf:retrieve tag) are using the date variable as suffix.


4)You are Done!
Now every time you take a back you don’t have to change the credentials to point to that org. All you have to do is change the date variable value to the current date.
Now open ANT in command prompt and type in ant as shown below.


Some points to consider into:


While installing ANT, I found three problems.

So, I thought to make you know this earlier to installing on your system.

If you get an error like these, do the prescribed solution. It would work! 
          D:\Software\apache-ant-1.8.4-bin\apache-ant-1.8.4\bin>ANT -version
          Unable to locate tools.jar. Expected to find it in C:\Program Files\Java\jre7\lib\tools.jar
          Apache Ant(TM) version 1.8.4 compiled on May 22 2012
    • Solution: Make sure you have tools.jar file in the above mentioned path.
   2.
          D:\Software\apache-ant-1.8.4-bin\apache-ant-1.8.4\bin>ANT Dev1Backup
          Buildfile: D:\Software\apache-ant-1.8.4-bin\apache-ant-1.8.4\bin\build.xml

          Dev1Backup:
              [mkdir] Created dir: D:\Software\apache-ant-1.8.4-bin\apache-ant-1.8.4\bin\Dev1Backup_01-22-2013

          BUILD FAILED
          D:\Software\apache-ant-1.8.4-bin\apache-ant-1.8.4\bin\build.xml:23: Problem: failed to create task or type antlib:com.salesforce:retrieve
          Cause: The name is undefined.
          Action: Check the spelling.
          Action: Check that any custom tasks/types have been declared.
          Action: Check that any / declarations have taken place.
          No types or tasks have been defined in this namespace yet

          This appears to be an antlib declaration.
          Action: Check that the implementing library exists in one of:
                  -D:\Software\apache-ant-1.8.4-bin\apache-ant-1.8.4\bin\..\lib
                  -C:\Documents and Settings\sudhir.kumarjaiswal\.ant\lib
                  -a directory added on the command line with the -lib argument

    • Solution: Make sure to add ant-salesforce.jar file inside lib folder (here for example put it inside D:\Software\apache-ant-1.8.4-bin\apache-ant-1.8.4\lib
    3.
          D:\Software\apache-ant-1.8.4-bin\apache-ant-1.8.4\bin>ANT Dev1Backup
          Buildfile: D:\Software\apache-ant-1.8.4-bin\apache-ant-1.8.4\bin\build.xml

          Dev1Backup:

          BUILD FAILED
          D:\Software\apache-ant-1.8.4-bin\apache-ant-1.8.4\bin\build.xml:23: Invalid username, password, security token; or user locked out. Are you at a new location?
          When accessing Salesforce--either via a desktop client or the API--from outside of your companyÆs trusted networks,
          you must add a security token to your password to log in.
          To receive a new security token, log in to salesforce.com at http://login.salesforce.com and click      Setup | My Personal Information | Reset Security Token.

    • Solution: Make sure to append Security token at the end of password in build.properties file.
      • P.S: You may need this security token when you are not connected to the VPN.

Thursday, 7 February 2013

How to Integrate Social Networking Sites like Facebook and Twitter into Salesforce?


1. Install the app “Salesforce for  Twitter and Facebook (v4.6)” from appexchange

2. Select “Salesforce for Social Media” app from the app drop down menu

3. Create a Facebook page or Twitter account in Facebook or Twitter respectively
In Salesforce, create new facebook page by using “Facebook Page” tab. Give that page an identifying name and enter the facebook page id from your facebook account.

4. Now it’s time to validate the page created inside Salesforce: Goto the given facebook user and click “Grant Facebook Access”. Select the facebook page you want to validate and assign it to that user as Admin.

5. To activate scheduled searches into these social networking sites:
Follow Social Setup ---------? Scheduled Searched ------? Select time interval

6. Click on “Conversation” to view and reply to them

7. Click on “Social Publisher” to :
Insert message: to Twitter, Facebook and/or Chatter at one go.
(Or, you can use “Social Agent” to share any comments)
Get conversation: from any Twitter a/c or Facebook pages

8. You can convert any of the particular conversation into:
Create Contact
Add to campaign (only for Twitter)
Create Lead
Create Case
Post to chatter
Create Solution
And many more…

9. To validate a user: Follow this step
Facebook Users--? Grant Facebook Access? Log in to use your Facebook account with CRM


Force.com Programming Best Practices


Apex
  • Since Apex is case insensitive you can write it however you’d like. However, to increase readability, follow Java capitalization standards and use two spaces instead of tabs for indentation.
  • Use Asychronous Apex (@future annotation) for logic that does not need to be executed synchronous.
  • Asychronous Apex should be “bulkified”.
  • Apex code must provide proper exception handling.
  • Prevent SOQL and SOSL injection attacks by using static queries, binding variables or the escapeSingleQuotes method.
  • When querying large data sets, use a SOQL “for” loop
  • Use SOSL over SOQL where possible – it’s much faster.
  • Use Apex Limits Methods to avoid hitting governor exceptions.
  • No SOQL or SOSL queries inside loops
  • No DML statements inside loops
  • No Async (@future) methods inside loops
  • Do not use hardcoded IDs

Triggers

  • There should only be one trigger for each object.
  • Avoid complex logic in triggers. To simplify testing and resuse, triggers should delegate to Apex classes which contain the actual execution logic. See Mike Leach’s excellent trigger template for more info.
  • Bulkify any “helper” classes and/or methods.
  • Trigers should be “bulkified” and be able to process up to 200 records for each call.
  • Execute DML statements using collections instead of individual records per DML statement.
  • Use Collections in SOQL “WHERE” clauses to retrieve all records back in single query
  • Use a consistent naming convention including the object name (e.g., AccountTrigger)

Visualforce

  • Do not hardcode picklists in Visualforce pages; include them in the controller instead or you can use Custom Settings for larger picklist values.
  • Javascript and CSS should be included as Static Resources allowing the browser to cache them.
  • Reference CSS at the top and JavaScript a the bottom of Visualforce pages as this provides for faster page loads.
  • Mark controller variables as “transient” if they are not needed between server calls. This will make your page load faster as it reduces the size of the View State.
  • Use to iterate over large collections.
  • Use the cache attribute with the component to take advantage CDN caching when appropriate

Unit Testing

  • Use a consistent naming convention including “Test” and the name of the class being tested (e.g., Test_AccountTrigger)
  • Test classes should use the @isTest annotation
  • Test methods should create all data needed for the method and not rely on data currently in the Org.
  • Use System.assert and System.assertEquals liberally to prove that code behaves as expected.
  • Test each branch of conditional logic
  • Write test methods that both pass and fail for certain conditions and test for boundary conditions.
  • Test triggers to process 200 records – make sure your code is “bulkified” for 200 records and doesn’t throw the dreaded “Too many SOQL queries: 21″ exception.
  • When testing for governor limits, use Test.startTest and Test.stopTest and the Limit class instead of hard-coding governor limits.
  • Use System.runAs() to execute code as a specific user to test for sharing rules (but not CRUD or FLS permissions)
  • Execute tests with the Force.com IDE and not the salesforce.com UI. We’ve seen misleading code coverage results when running from the salesforce.com UI.
  • Run the Force.com Security Source Scanner to test your Org for a number of security and code quality issues (e.g., Cross Site Scripting, Access Control Issues, Frame Spoofing)


For Reference:

How to deal with the error: "Maximum View State size limit (135KB) exceeded" ?


Whenever I have worked on some Web Services requirement, I have generally come across this error message : "Maximum View State size limit (135KB) exceeded".
This time I encountered this known error when I was working on Account Online Passwords enhancement for February Release 2013
So today I am taking time to jot down the way to minimize the probability of getting this error.

Few points about view state here:

The view state of a web page is composed of all the data that's necessary to maintain the state of the controller during server requests (like sending or receiving data). Since the view state contributes to the overall size of your page, performance of a page can depend on efficiently managing the view state.

  1. Salesforce allows Visualforce pages to have a maximum view state size of 135KB. The View State tab shows you which elements on your page are taking up that space. A smaller view state size generally means quicker load times.
  2. To minimize your pages' view state, you can optimize your Apex controller code and remove any superfluous Visualforce components used.
  3. For example:
    1. If you notice that a large percentage of your view state comes from objects used in controllers or controller extensions, consider refining your SOQL calls to return only data that's relevant to the Visualforce page.
    2. If your view state is affected by a large component tree, try reducing the number of components your page depends on.
    3. Another important point here is the use of Transient keyword. The Transient variable can not be saved, and shouldn't be transmitted as part of the view state for visual force page.

Point to be noted down is that:

  • Any apex component under tag are counted against View State size. So this could be reduced by using HTML/CSS/JavaScript components because they are not counted against apex view state limit.
  • Try using JavaScript Remoting instead of using apex action tags. In addition to decreasing view state size, you could get data near to real time.

I could show you a scenario where  how I reduced the View State size from around 136KB to around 85KB just by replacing with HTML tags 
in conjuction with tag.

Initial piece of code:


Refined piece of code


Note: However, here we need to use CSS for formatting Table header values.

So we can see how significantly the view state size is reduced just by replacing one apex tag with HTML tag. 

Supporting Links:

How to use Salesforce Dataloader Command Line Interface Quickstart (CLIq) ?


Requirements
===========
Data Loader 17.0 or later (Login to Salesforce, and go to Setup|Data Management|Data Loader)
Windows XP or Later (See CLIqOnUnix for Unix installation)
Installation Instructions
=================
  • Install Data Loader version 17.0 or later.
  • Download the latest version of CLIq:
  • Unzip cliq.zip into your Data Loader home directory. Typically this is:

    • C:\Program Files\salesforce.com\Apex Data Loader 17.0 -or- C:\Program Files\salesforce.com\Data Loader
      • You should have a directory:
                      C:\Program Files\salesforce.com\Apex Data Loader 17.0\cliq     

Configuration
============
To configure proxy support, enter your proxy settings in cliq.properties:

#
# CLIq.properties
#

### All of these properties are Optional ###

#Set your Salesforce username and password
sfdc.username=
sfdc.password=

# i.e. proxy.company.com
sfdc.proxyHost=
# i.e. 8080
sfdc.proxyPort=
sfdc.proxyNtlmDomain=
sfdc.proxyUsername=
sfdc.proxyPassword=

# Use https://test.salesforce.com/services/Soap/u/ for Sandbox instances
# NOTE: Make sure the version is equal or lower than your version of Data Loader.
#
# For example:

To use CLIq with Sandbox, uncomment the sfdc.endpoint line.

Starting CLIq
===========

To run CLIq, run cliq.bat on Windows or cliq.sh on UNIX.

Using Graphical UI
================

1. Choose an Operation
  The process name is a string which is used to identify your process. Example: Export_Accounts
2. Login
3. Enter Query or Entity
4. Review Results and Create Files


Using the Files
===============

  • A directory name will be created using the process name you entered. For example, if your process name is import accounts, CLIq will create a directory called import_accounts
    • Cliq 1.2: The process directory will be under dataloaderhome/cliq
    • Cliq > 1.2: The process directory will be under dataloaderhome/cliq_process
  • For DML Opertations (Insert, Update, Upsert, Delete), you will need to complete the configuration manually. See instructions for Configuring DML.
  • To run the script
    • On Windows, open the processname directory and run processname.bat.
  • Instructions for Configuring DML:
    • Replace processname/read/processname.csv with your source CSV file.
      • e.g,
                    "ID","LASTNAME","EMAIL","COMPANY"
                    "00Q7000000TNtBCEA1","Miller","nouser@acme.com","Acme"
                    "00Q7000000TNtBDEA1","Smith","noone@widgetmaker.com","Widgets R US"
      • Do not change the file name. Just replace the existing .CSV file with your file.
      • Note the headers for each column
    • Open processname/config/processname.sdl. Create a mapping with the CSV column header on the left and the Salesforce Field on the right.
               e.g,
               # Created by Dataloader Cliq
               #
               # Create your field mapping list in the following format
               ID
=Id
               LASTNAME
=LastName
               EMAIL
=Email
               COMPANY
=Company

    • The Salesforce Field is case-sensitive
    • Insert should not have an "Id" mapping
    • Update requires an "Id" mapping
    • Delete only needs an "Id" mapping

Some more about CLIq:

What CLIq Does


  • Quickly configure scheduled exports/updates for your Salesforce Org
  • Text and graphical interface
  • Handles all the tricky stuff:
    • Creates a process-conf.xml
    • Validates your username/password, queries, and entity names (avoids case-sensitivity issues)
    • Encrypts password
    • Creates an organized directory structure
    • Creates a bat file which can be scheduled on Windows using Windows Scheduler
    • Creates a sh script which can be scheduled on UNIX using cron
  • Written in Java - Tested on Windows and Mac OS X (UNIX)!

What CLIq Doesn't Do (Yet)


  • Write SOQL statements (for Exports) - You'll need to know how to write SOQL.
  • Configure Data Loader to write directly to Databases
  • Automatically configure SDL file.


  • Helpful Links: